Jupyter
For heavy computations, you can run a Jupyterhub service in a Slurm job allocation on any cluster. Jupyterhub allows you, among others, to access a to a python notebook. To achieve this, you need to the following steps:
- Find the module to load
- Submit a jupyter job in a cluster
- Connect your browser to the jupyterhub
Find the module to load
Connect to a cluster using ssh or MobaXterm.
Search for a JupyterLab module in the documentation or execute in a cluster one of this commands:
$ module spider JupyterLab
Chose one of the available modules and use module spider again to get the module dependencies. Example:
$ module spider JupyterLab/4.0.5-GCCcore-12.3.0
...
You will need to load all module(s) on any one of the lines below before the "JupyterLab/4.0.5-GCCcore-12.3.0" module is available to load.

  releases/2023a
...
In this case you will need to load releases/2023a before loading JupyterLab.
Submit a job to start jupyter
Once you know which module to load, submit a job to work for 1 hour with the command:
$ srun -t 1:00:00 --pty bash -c 'ml releases/2023a ; ml JupyterLab; jupyter lab --ip $(hostname -i | sed "s/.* //")'

...
...
[I 2025-05-08 18:28:47.123 LabApp] JupyterLab extension loaded from /opt/sw/arch/easybuild/2023a/software/JupyterLab/4.0.5-GCCcore-12.3.0/lib/python3.11/site-packages/jupyterlab
[I 2025-05-08 18:28:47.123 LabApp] JupyterLab application directory is /opt/sw/arch/easybuild/2023a/software/JupyterLab/4.0.5-GCCcore-12.3.0/share/jupyter/lab
[I 2025-05-08 18:28:47.123 LabApp] Extension Manager is 'pypi'.
[I 2025-05-08 18:28:47.124 ServerApp] jupyterlab | extension was successfully loaded.
[I 2025-05-08 18:28:47.125 ServerApp] Serving notebooks from local directory: /home/users/a/l/alozano
[I 2025-05-08 18:28:47.125 ServerApp] Jupyter Server 2.7.2 is running at:
[I 2025-05-08 18:28:47.125 ServerApp] http://10.0.7.36:8888/lab?token=7ab5095028b310cf7578841fd92dc099b10ccaeba33ecdd2
[I 2025-05-08 18:28:47.125 ServerApp]     http://127.0.0.1:8888/lab?token=7ab5095028b310cf7578841fd92dc099b10ccaeba33ecdd2
[I 2025-05-08 18:28:47.125 ServerApp] Use Control-C to stop this server and shut down all kernels (twice to skip confirmation).
[C 2025-05-08 18:28:47.134 ServerApp]

    To access the server, open this file in a browser:
        file:///home/users/c/e/cecilogin/.local/share/jupyter/runtime/jpserver-565107-open.html
    Or copy and paste one of these URLs:
        http://10.0.7.36:8888/lab?token=7ab50950e8b310c87578841fd92dc099ba0ccaeba33ecdd2
        http://127.0.0.1:8888/lab?token=7ab50950e8b310c87578841fd92dc099ba0ccaeba33ecdd2
From the output take note of the compute node IP address (10.0.7.36) the port
(8888) and the connection token for next step. Keep the terminal open until you
have finished using JuptyerLab. To end the job use CTRL-C.
Connect to the JupyterLab web interface
Linux or MacOS
If you are using Linux or MacOS, then use the nice little tool named sshuttle to access it.
Warning
sshuttle is currently not supported directly on Microsoft Windows.
Sshuttle is a program that, according to its documentation, acts as a
“Transparent proxy server that works as a poor man’s VPN. Forwards over ssh.
Doesn’t require admin. Works with Linux and MacOS.” Installation on a Linux or
MacOS laptop can be done with apt, pacman, dnf depending on your
Linux distribution, or with brew, MacPort on MacOS, but you can also
install it with pip or git clone from GitHub directly. See the GitHub
page for details.
After you have installed sshuttle, make sure you can access the cluster
via the ssh command. In the following, we will assume the connection to the
CECI cluster where you started the jupyter job works by just running ssh
cecicluster on your terminal.
Then, create a tunnel with sshuttle. Open a terminal in your machine that
will be dedicated to that and run the following in it:
$ sshuttle -r cecicluster XX.XXX.X.X/YY
[local sudo] Password
Warning: No xauth data; using fake authentication data for X11 forwarding.
client: Connected.
The IP range to introduce for sshuttle depends on the cluster where you
started the JuptyerLab job.
- nic5 10.252.1.0/16
- lemaitre4 10.4.1.1/16
- dragon2 10.102.169.0/24
- hercules 192.168.1.100/23
- lyra 10.0.7.1/24
When running the command it will ask for your password in order to elevate
privileges (sudo). That is needed because it will modify temporarily
low-level network routing. As long as it runs, the private network of the
cluster worker nodes will be accessible from your laptop, wherever you are
connected. Leave that terminal session open for as long as you need access to
the Jupyter service in your job.
If your terminal supports it, you can then click on the URL from the srun
interactive job that starts with http://10.xx or http://192.xx in the
previous step. Otherwise simply copy that URL in your browser and you should
land on the JupyterLab interface.
Once you are finished hit CTRL-C in both terminals to stop everything.
Windows
If you are using Windows, we assume you already installed and configured MobaXterm.
Use the compute node IP address and port you get when submitting the job.
To reach the IP address of the compute node from your computer (localhost) two forwarding ports must be created. The first one will forward a intermediate localhost port (1111) to the front-end (nic5, lemaitre4 ...) through the gateway. The second one will forward the local port 2222 on the localhost port 1111 to the computer node port 8888
Create the first tunnel between your computer and the cluster frontend:
- Open MobaXTerm and click on “tunnelling”
 and click on “new ssh
tunnel”
and click on “new ssh
tunnel”  to create the first tunnel.
 - Fill the local port with 1111.
- Fill “ssh server” with the login and gateway address of your university.
- Fill the remote server with the frontend cluster address
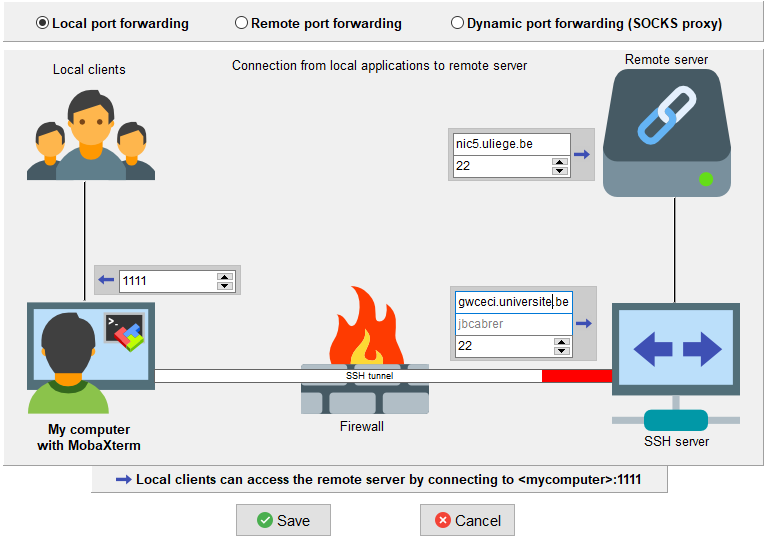
- Click Save and set the name of the new tunnel with the cluster name
- Click on the key
 and add your CÉCI key id_rsa.ceci
You can create a tunnel for each cluster (nic5, lemaitre4 ...)
Create the second tunnel between your computer and the compute node through the first tunnel:
- Create a “new ssh tunnel” .
- Fill the local port with 2222.
- Fill “ssh server” with the localhost forwarded port 1111 and your CÉCI user login name
- Fill the remote server with the compute node IP and port you get when submitting the job.
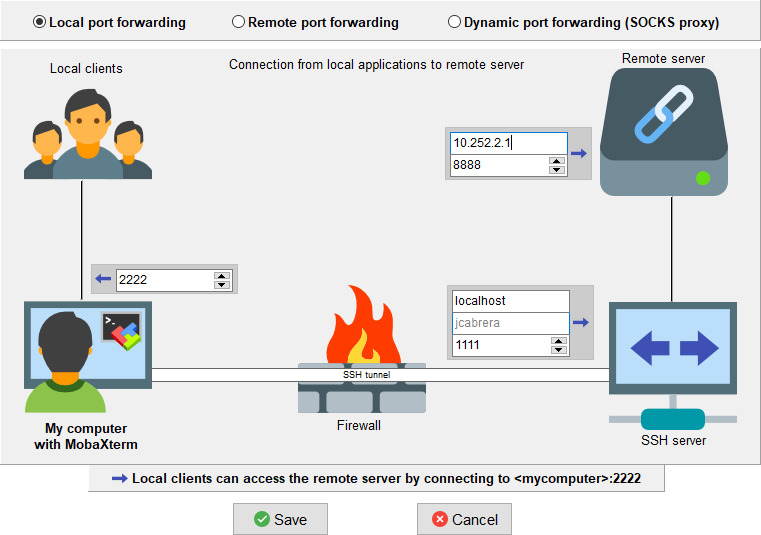
- Click Save and set the name of the new tunnel as node.
- Click on the key and add your CÉCI key id_rsa.ceci
You will have something like this:
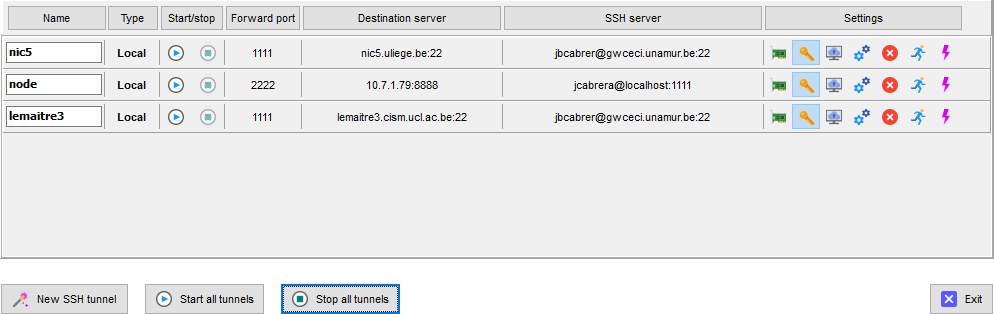
Start the tunnel for the cluster where you submitted the job and the
tunnel for the node. Then open your browser at
http://localhost:2222/lab?token=XXXXXXXXXX. Replacing XXXXXXXXXX with the
token you received wen submitting the job.
See a video with a connexion example on dragon2.
Note
Each time you summit a new jupyterhub job, you could receive a different IP address and port. Replace the IP address and port in the node tunnel before starting it.