CÉCI Suite setup
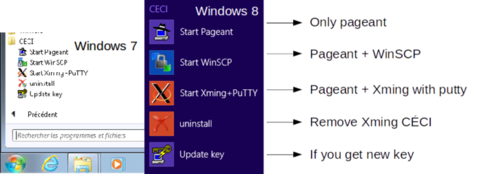
Install Xming_CECI
Xming_CECI contains a stand alone version of PuTTY, pageant, plink and winSCP. Putty and winSCP session are configured for the CÉCI clusters.
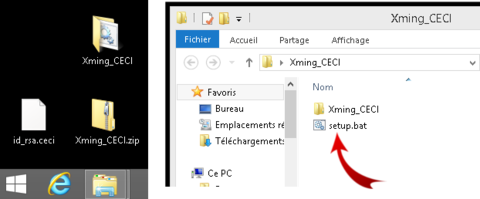
- Download Xming_CECI.zip and extract
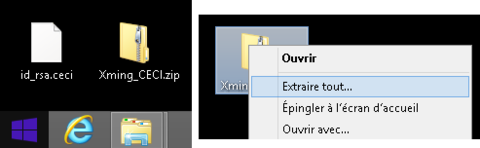
- Open the extracted Xming_CECI folder and execute (double click) setup.bat
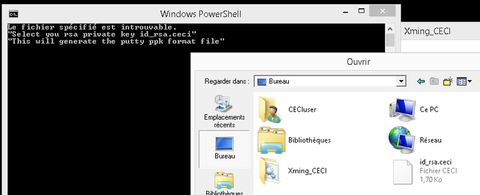
- Browse to select your id_rsa.ceci key file
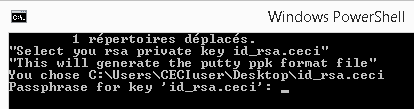
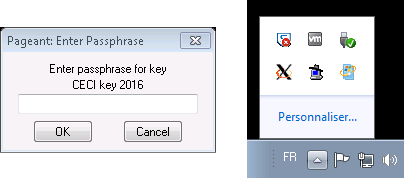
- You are prompted for your passphrase. Enter here the passphrase you chose while filling in the CÉCI web application form. The characters are hidden while you type and no asterisk appears.
- Add your CÉCI login name

After installation you get a new group of links in the windows start menu. The programs are installed in %USERPROFILE%/Xming_CECI directory
OR Install PuTTY suite
Download The latest release version of PuTTY windows installer. This will install:
- PuTTY (the Telnet and SSH client itself)
- PSCP (an SCP client, i.e. command-line secure file copy)
- PSFTP (an SFTP client, i.e. general file transfer sessions much like FTP)
- Plink (a command-line interface to the PuTTY back ends)
- Pageant (an SSH authentication agent for PuTTY, PSCP, PSFTP, and Plink)
- PuTTYgen (an RSA and DSA key generation utility).
Connect with Xming+PuTTY
If you installed Xming_CECI
- Click to ‘start menu’ > CECI > ‘Start Xming+PuTTY’
- If it is not already running, Pageant will start and ask for your passphrase to decrypt the key
- You will get a Pageant and Xming icon in your task bar
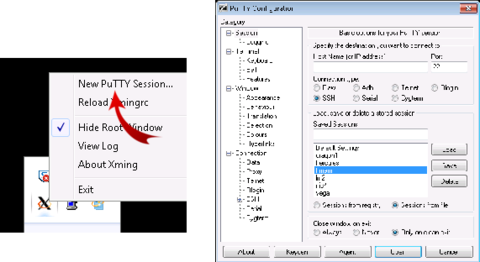
- Right click on Xming icon and select “New Putty Session”
- In PuTTY double click in a cluster name to connect
Converting the private key
If you installed the PuTTY suite, before you can connect to a cluster, you need to ‘translate’ the OpenSSH-2 key you received into the key-file format that is used by PuTTY. To do so, you need to use the PuTTYgen software
- Launch PuTTYgen from start menu > PuTTY > PuTTYgen
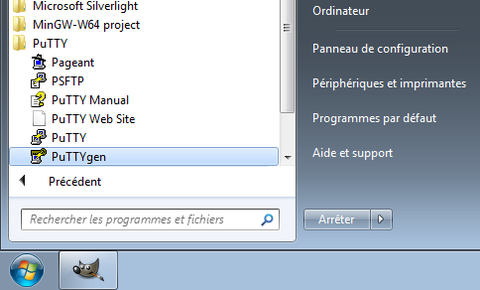
PuttyGen Launch
- Hit the ‘Load’ button
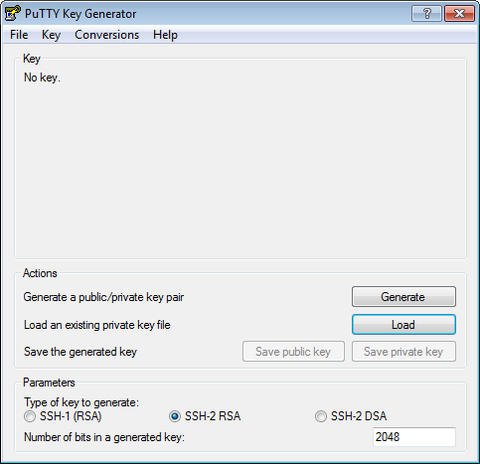
PuttyGen Load
- Locate the ‘id_rsa.ceci’ file you received by email. Make sure to choose ‘All files’ in the ‘Files of type’ dropbox so that the file appears in the list. Click ‘Open’.
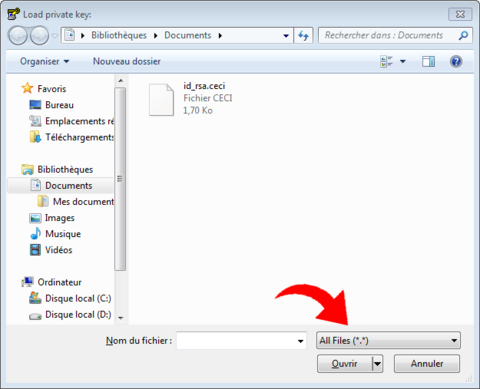
PuttyGen Open
- You are prompted for your passphrase. Enter here the passphrase you chose while filling in the CÉCI web application form.
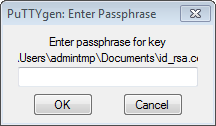
PuttyGen Passphrase
- Once the import succeeds, you get the following message:

PuttyGen Notice
- You can change the ‘Key comment’ for better tracking your key. Do not change the passphrase, it will stay the same as the imported key.
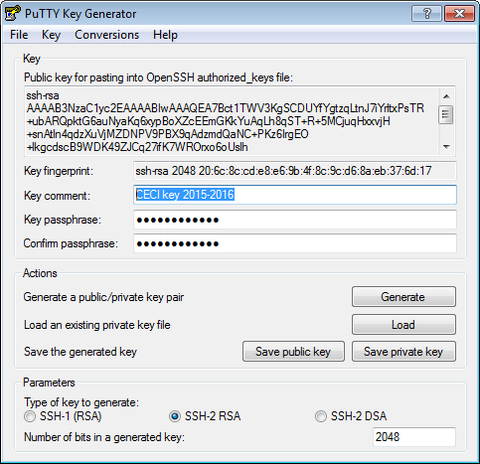
PuttyGen Comment
- Now save the new file by hitting the ‘Save private key’ button.
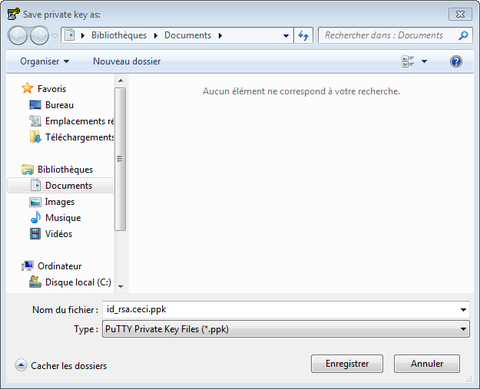
PuttyGen Save Key
You are now ready to use PuTTY to access the clusters.
Opening a shell with PuTTY
- Launch PuTTY from ‘start menu’ > PuTTY > PuTTY and set the hostname,
e.g.
hmem.cism.ucl.ac.be
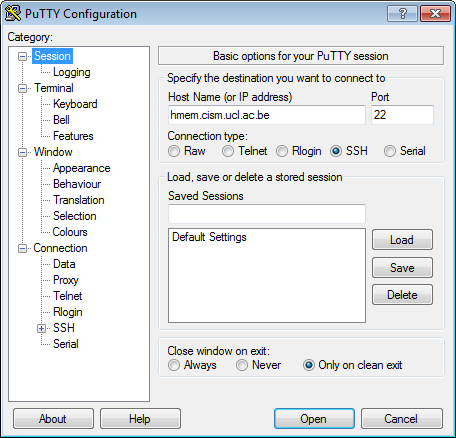
Putty Session
- Under the ‘Connection > Data’ category, put your login in the ‘Auto-login username’ box.
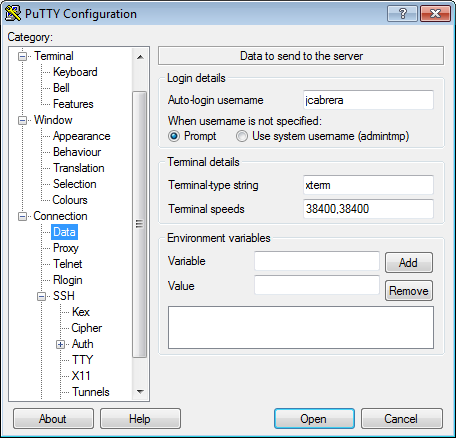
Putty Auto-login
- Under the ‘Connection > SSH > Auth’ category, click the ‘Browse’ button and locate the file you saved earlier with PuTTYgen. You can tick the ‘Allow agent forwarding’ option to use the agent for proxy connections
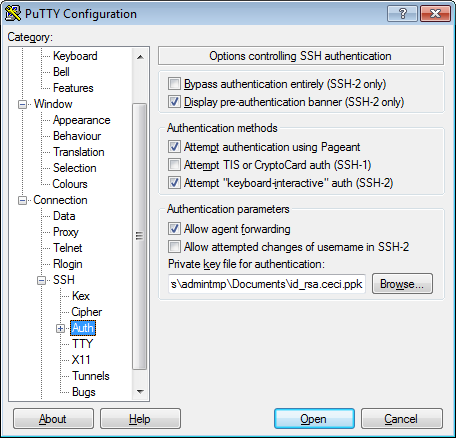
Putty Auth
- Under the ‘Connection > SSH > X11’ category, it is always useful to tick the ‘Enable X11 forwarding’ option. Beware that you need an X server such as Xming installed on your computer to be able to use X11 forwarding.
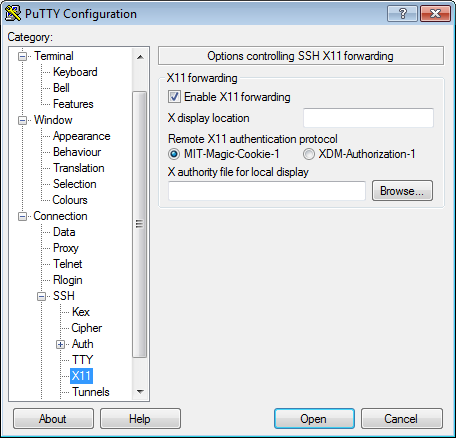
Putty X11
- At this point, you can come back to ‘Session’ category, set the of the session name in ‘Saved Session’ field and save the profile using the ‘Save’ button.
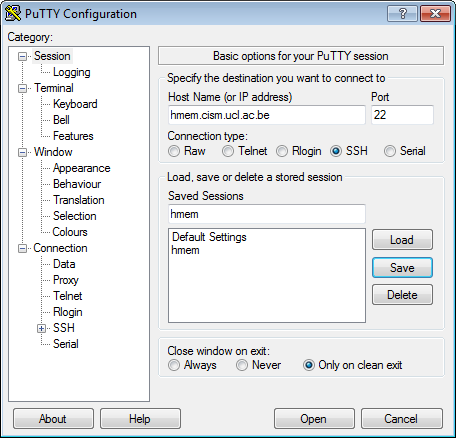
Putty Save Session
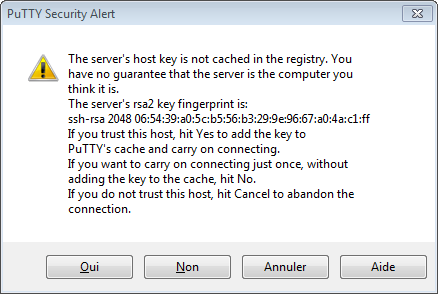
- Select the saved session and click ‘Open’ to start the connexion. The first time you successfully connect, PuTTY will warn you that it does not know the computer. Click ‘yes’ if the host fingerprint matches the one announced in the cluster page
Putty Alert
- Give your passphrase, i.e. the password you chose while filling in the web application form.
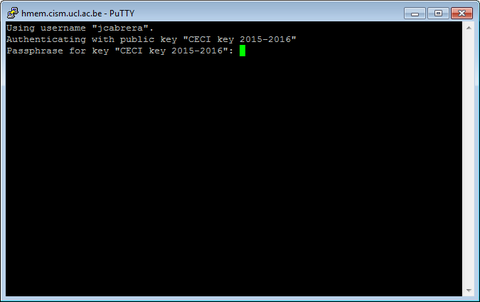
Putty Passphrase
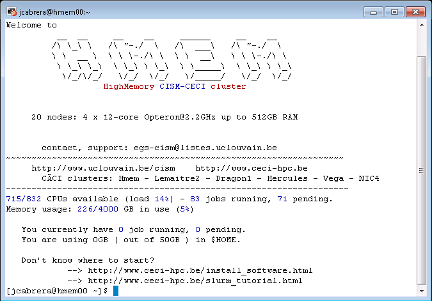
- You are now connected.
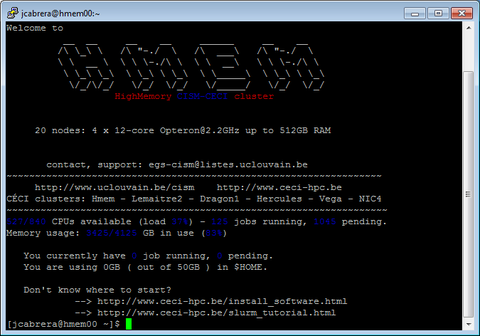
Putty Connected
Using an SSH agent.
If you do not want to type your passphrase each time you connect, you
can use the PuTTY SSH Agent (pagent.exe).
- If you do not have it, download it from the PuTTY website. Start it ; it should then be visible in your task bar.

hostanduser
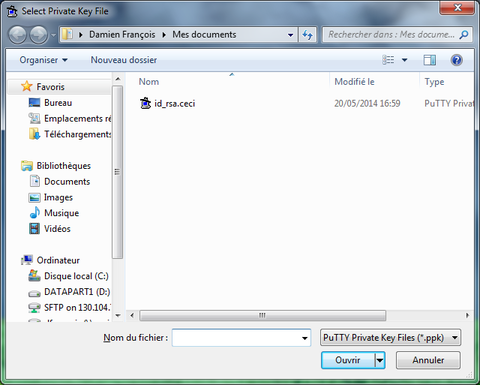
- Then click it and choose ‘Add key’.
hostanduser
- Choose the file you generated using PuTTYgen (cf. supra).
hostanduser
- Enter your passphrase.
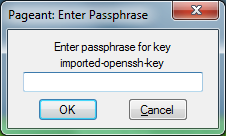
hostanduser
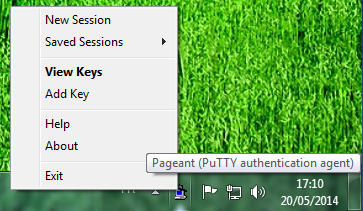
Now you can check that your key has been loaded by clicking on the icon in the tray bar and choosing ‘View keys’. Connect using PuTTY without typing your passphrase (as long as the agent is running.)
You can forward your agent through your SSH connexions (for instance to copy data from one cluster to another) by ticking the box “Allow agent forwarding” in Connection > SSH > Auth.
You can get more information about the use of the agent in the online documentation.
Going through a gateway or VPN
As the clusters are not accessible from outside the university networks, you will need to use a SSH gateway and the university VPN in some cases. Going through a SSH gateway can be entirely transparent provided your client is correctly configured. The CÉCI does not offer a centralized gateway service, so you will have to use the one provided by the University you belong to:
- UCL: use
gwceci.cism.ucl.ac.beas SSH gateway with your CÉCI account. See the CISM documentation.- ULB: use
gwceci.ulb.ac.beas SSH gateway with your CÉCI account. You will need to use a VPN also if you are outside Belgium.- UMons: contact the local support team to learn how to setup the VPN, then use
dragon2.umons.ac.beas gateway.- UNamur: use
gwceci.unamur.bewith your UNamur identity (eID)- ULiège: use
gwceci.uliege.bewith your CÉCI account AND use the ULiège VPN.
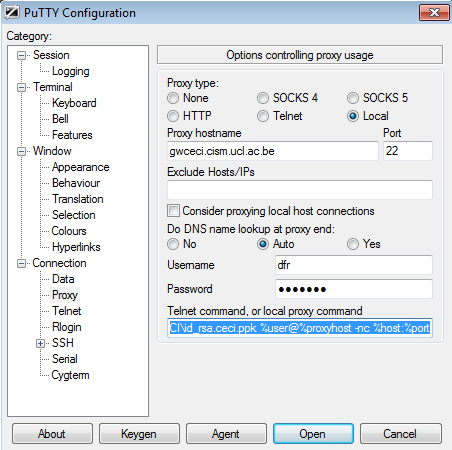
With Putty, you will need to go to the ‘Proxy’ item under ‘Connection’ and set the following:
- Proxy type: Local
- Proxy hostname: the gateway you will use
- Port: 22
- Username: your login on the gateway
- Password: your password if you connect with a password, or your passphrase if you connect with a passphrase-protected SSH key
As for the ‘Telnet command, or local proxy command’, things are different depending on whether or not you are using a key to connect to the gateway.
If using a password:
<C:\path-to\>plink -v -pw %password %user@%proxyhost -nc %host:%port
If using an SSH key:
<C:\path-to\>plink -v -i <C:\path-to-your\>id_rsa.ceci.ppk %user@%proxyhost -nc %host:%port
In both cases, make sure to replace the <C:\path-to\>plink part with the actual location of your Putty installation, and <C:\path-to-your\>id_rsa.ceci.ppk with the path to your private key. For instance, if you used the CÉCI putty bundle, it should look like :
C:\Users\<your_local_username>\Xming_CECI\plink -v -i C:\Users\<your_local_username>\Xming_CECI\id_rsa.ceci.ppk %user@%proxyhost -nc %host:%port
Note
Make sure to have the Putty Agent running otherwise Putty will be stuck needing the passphrase but unable to prompt for it.
Note
Also make your connection to the gateway itself is functionnal before using it through a proxy command.
Creating a PuTTY shortcut
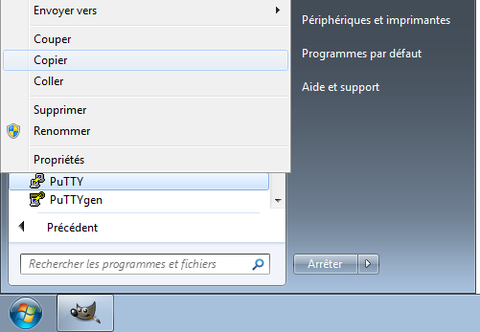
- Right click on the PuTTY shortcut ‘start menu’ > PuTTY > PuTTY and copy it.
PuTTY copy shortcut
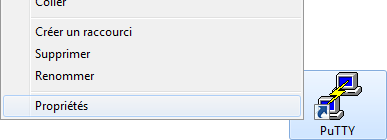
- Paste it onto the Desktop and right-click to change the properties.
PuTTY properties shortcut
- Add ‘-load Session‘ at the end of the ‘Target’ command. Where Session is the name of the session name of the previously saved profile e.g. hmem.
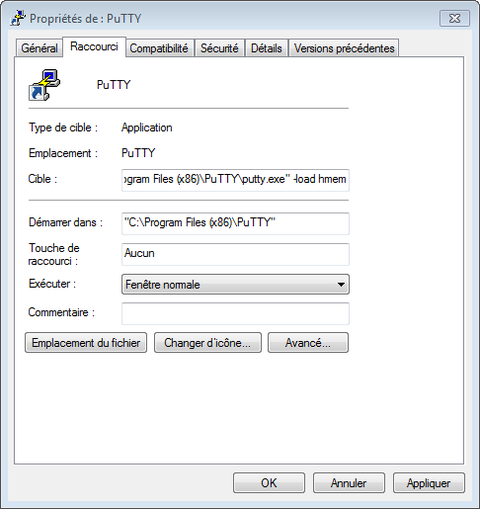
PuTTY properties shortcut
- Change the name of the shortcut to the specific connexion name.

PuTTY rename shortcut
Troubleshooting a session
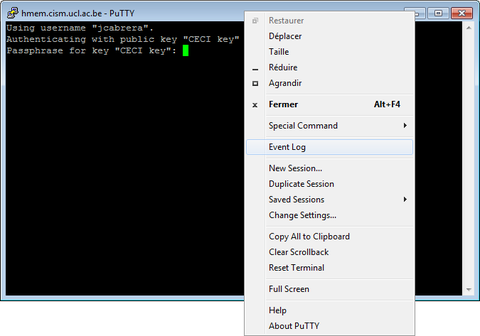
- If you have problems connecting to a server, you can access to the session log. Rigth click on the PuTTY window title. In the PuTTY menu select ‘Event Log’
PuTTY menu
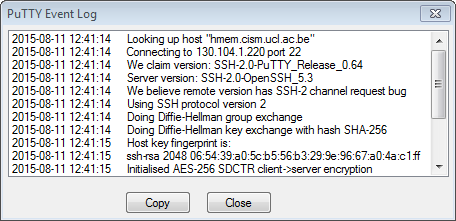
- This will display the event log.
PuTTY Event Log